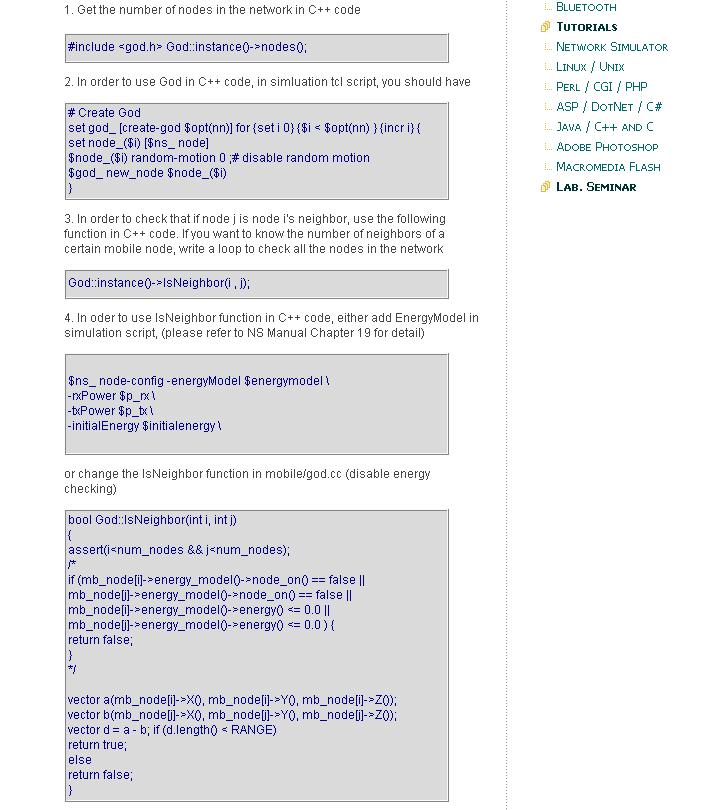
Showing posts with label tips. Show all posts

Mar 15, 2007

Tips : How to use two version of NS-2


If you would like to use two version of NS2, one old version and a another newer version. This is what you can set to call each different version of ns in the terminal/bash. Whenever you want to call the older version of ns, just make changes to the make file :

Example: Makefile.in

- snip -
NS = ns-old
- snip -

run "./configure && make install" again and you are done.

tags: , , , , , ,

Feb 25, 2007

Tips : How to scale your simulation to more nodes eg. > 500 nodes and increase the simulation speed


One of the biggest problem for the implementation of the Packet data structure of NS2 is that it does not math the realities. The packet in ns2 simulation keeps all packet headers for any protocols implemented in NS2. For example, a DSR routing packet may keep DSDV, AODV, or even a PING application header. For this reason, till today, a packet used in ns2 simulation, would have a header size around 40~64KB. And NO packet would be deleted to release the memory it holds until the end of the simulation.

So for a typical simulation with 100 nodes in ns2 around 1M packets exchanged (of course, you may reuse the packets already being freed through Packet::free(Packet*). To learn the implementation of it, please check file common/packet{.h,.cc} ), you may hold 10% of it, 100K packets, and you may use a memory at least 100K*64KB -> 6.4GB, which definitely would crash your computer even server computers.

SO what is the best way to scale the simulation and increase the simulation speed. Fortunately there are two ways :

1. Suggested by ns2 manual, putting the below codes in your tcl script
remove-all-packet-headers
add-packet-header DSR ARP LL MAC CBR IP

to simulation a CBR application on UDP with DSR as routing protocol in a wireless ad hoc network (OOPS!, UDP is not a header. This method is effective, but it requires you to understand most packets header you need.

2. Another way is my way, changing the tcl library for the packet headers. You may find the tcl library file for packet headers in ns2/tcl/lib/ns-packet.tcl, you may find a procedure starting as foreach prot . You can comment out all the headers you don't recognize, like all the Routing protocols you dont know, all Routers, all Multicast, all Transport Protocols except you need, all application layer protocols, some of the Wireless, some of the Mobility, Ad-Hoc Networks, Sensor Nets and all the Other. Finally, you may just have all the below left

foreach prot {
# Common:
Common
Flags
IP
# Transport Protocols
TCP
# Wireless
ARP
LL
Mac
# Mobility
AODV
} {
add-packet-header $prot
}

Here is a sample of the skeleton of the script for you to put your code for your own packet header.

Typically, after this way, you may just have a packet size as 256B. So even you have 500 nodes, and 10M packets need to be exchanged during the simulation. You just need 256MB (if 10% packets held) for it, which is lower than any common configuration of current PCs.

tags: , , , , , , ,

Jun 26, 2006

How to Start Research in Computer Networks: Seven Steps on the Road to Success

Extracted from here

This is a short note on how to start defining your topic of interest and zooming in on specific research problems and challenges. This note is geared towards graduate (M.S. and Ph.D.) students interested in computer networks related topics for their directed research (DR), M.S. thesis, or Ph.D. dissertation. The general guidelines, however, may apply to a larger class of students (e.g., in Electrical Engineering or Computer Science disciplines):
[Note: This is only a starting point. There's a lot more to research than what's here!]

1. Pick a direction or area of interest based on your background in netwoking (e.g., courses you have taken, readings, conferences, talks to Professors, etc.). Try to be as specific as possible. For example, do not pick 'multicast' (it is too general), but perhaps 'congestion control for reliable multicast' or 'multicast routing in ad hoc networks'. Do not pick 'wireless networks' (too general), but perhaps 'systematic testing of wireless MAC layer' or 'efficient handoff for IP mobility', for instance. There could be a list of topics that interest you (related or unrelated). I do not recommend a list of more than three topics.


2. Compile a set of 'keywords' to start searching for high quality readings for each of the previously selected topics. Good places to start your search are IEEE library on-line and ACM library on-line (both of which are freely available to USC students). Pick one research topic at a time.
You can also search on the web (e.g., Google) but please double check the publication details for quality (there are a lot of papers out there!).
Another literature-rich scientific digital library is citeseer.com, but again, please double check details for quality.


3. Out of the search hits, select around 15-20 papers that you think are most related to what you had in mind and are of the highest quality. Do NOT read all these papers yet!
Check the title, abstract, names of authors, their affiliations, and most importantly the conference or journal. Many IEEE and ACM conferences/Journals are of high quality. Some, however, are more selective and competitive than others. Examples of well-known conferences/journals include, but are not limited to:
* In the general area of Computer Networks: IEEE/ACM Transactions on Networking (ToN), IEEE Journal on Selected Areas in Communications (JSAC), ACM SIGCOMM, IEEE INFOCOM, IEEE ICNP, IEEE SIGMetrics, Computer Networks Journal (Elsevier), IEEE ICC, IEEE GlobeCom, ACM CCR, among others.
* In the more specific areas of wireless networks (including mobile ad hoc networks, sensor networks and cellular-like infrastructure-based networks): ACM MobiCom, ACM MobiHoc, ACM MONET Journal, AdHoc Networks Journal (Elsevier), ACM Wireless Networks (WiNet) Journal, ACM SenSys, IEEE/ACM IPSN, IEEE WCNC, ACM MC2R, to name a few.
Some gathered statistics about conference/workshop acceptance rates can be found through Kevin Almeroth's website. Note, however, that this is only one possible indication of quality.
[Note: try to refine your set of keywords and perform multiple searches to cover most related quality work.]
Another hint is to use references and citations. Usually the most cited work by high quality papers is also of high quality. If you like a specific paper look at the list of references, this will give you a good direction to follow.


4. For the selected 15-20 papers read only the abstract, introduction and conclusion in detail (you may skim the rest of the paper for a general idea). Identify the emphasis of each paper:
* (I) which problem it addresses,
* (II) what solution it proposes,
* (III) how the solution differs from previous solutions, and
* (IV) what are the main contributions and conclusions.
Out of these 15-20 papers, and based on your reading and understanding, pick a list of 4-6 papers that you think are the highest quality and that address your research interests and the challenges in the field most appropriately.


5. Read those 4-6 papers from beginning to end, identifying in detail: (I) the main approaches, (II) methods of analysis: (a) metrics, (b) evaluation tools, and (c) analysis and interpretation of resulting simulation or measured data, and (III) conclusions. At the same time, try to keep a list of what you think the authors may have missed in the paper/study, gaps or limitations that could be improved upon and any ideas on how to accomplish these improvements. Some questions to ask include: Did all/some papers use similar approaches? Have they used the same evaluation criteria, or method of analysis? If not, then what are the strengths/weaknesses of each method? Also, keep a list of ideas that you want to explore further, or background material you want to brush upon. This will create another list of readings for you in later stages.


tags:

May 10, 2006

GT-ITM : Network Topology Generator

A topology generator creates a graph representation of a network based on a model and a set of parameters specified by the user. These representations are often used as input to a simulation; if the graph approximates characteristics of a real network, then the simulation results predict the behavior of a network protocol or application if it were to be deployed.

Most simulations from literature in the field have used representations of a real topology (e.g. the Arpanet or a well-known provider's backbone), simple models (e.g. a ring or a star), or randomly-generated flat topologies using a variation of Waxman's edge-probability function. Recently, more complex randomly-generated hierarchical models have been used to better approximate the Internet's hierarchical structure.

Models

1. Flat Random

Methodology: Randomly place nodes at locations in a plane, then connect nodes with edges according to the probability given by the edge mode.

Parameters: Number of nodes, scale, edge method, alpha, beta, gamma. See a comment from the code for an explanation of how each method uses alpha, beta, and gamma.

Example:
# 10 nodes, 10x10 grid, pure random, 0.2 edge probability
10 10 1 0.2

2. N-Level Hierarchical

Methodology: Start with the top level and create a flat random graph. Recursively replace each node in current level with a connected flat random graph. Resolve edges between levels by selecting nodes at random from within the replacement graph.

Parameters: Number of levels, For each level, a set of parameters describing the graph.

Example:
# 3 levels, each with 10 nodes, Waxman 1, alpha and beta as shown
3
10 10 1 0.7 0.2
10 10 1 0.5 0.2
10 10 1 0.4 0.2

3. Transit-Stub Hierarchical

Methodology: Create a 2-level hierarchy, with each top-level node representing a transit domain, and with the second level giving each intra-domain graph. Next, attach stub domains to each transit domain. Finally add extra transit-stub and stub-stub edges.

Parameters: Number of stubs per transit, Number of transit-stub edges, Number of stub-stub edges, Top-level, transit-domain, and stub domain parameters.

Example:
# 3 stub domains per transit, no extra transit-stub or stub-stub edges
# 1 transit domain, fully connected
# transit domains have average of four nodes, edge prob 0.6
# stub domains have average of 8 nodes, edge prob 0.4
3 0 0
1 10 3 1.0
4 20 3 0.6
8 10 3 0.4


Generating graphs from GT-ITM topology generator.

Download
the GT-ITM Topology Generator software.
The GT-ITM topology generator can be used to create flat random graphs and two types of hierarchical graphs, the N-level and transit-stub. Take a look at the examples in Daniel Zappala's homepage. Also look at the documents under docs subdirectory of GT-ITM's distribution.

For example, we need to create a transit-stub graph with 200 nodes. So we create a specification file, say ts200, that goes like this:

## Comments :
## <#method keyword> <#number of graphs> [<#initial seed>]
## <#stubs/xit> <#t-s edges> <#s-s edges>
## <#n> <#scale> <#edgemethod> <#alpha> [<#beta>] [<#gamma>]
## number of nodes = 1*8* (1 + 4*6) = 200
ts 10 47
4 0 0
1 20 3 1.0
8 20 3 0.8
6 10 3 0.5


On running 'itm ts200', 10 transit-stub graphs with 200 nodes each will be created starting with initial seed 47. line 4 0 0 means each transit node will have 4 stub domains connected to it;there shall be no extra transit-stub edges and no extra stub-stub edges. Line 1 20 3 1.0 means there will 1 transit domain in each graph. Line 8 20 3 0.8 says each transit domain will have, on an average, 8 transit nodes with an edge between each pair of node with a probability of 0.8 and line 6 10 3 0.42 says every stub domain shall have, on an average, 6 nodes each with an edge between every pair with a probability of 0.5.

For a more complete description of the parameter specification file see models.ps file under docs subdirectory.

The graphs produced are named as ts200-[0 to 9].gb and are in Stanford Graph Base Output format. This needs to be converted to tcl format for ns-2 to interpret it correctly.

Conversion of GT-ITM output to ns-2 format

Download the sgb2ns conversion program. Follow instructions in the README file and create the sgb2ns executible. Note that sgb2ns should be expanded in the gt-itm directory, and its executibles will be placed in gt-itm/bin subdirectory. This distribution also contains ts2ns and sgb2hier as described below.

Modify sgb2ns's Makefile to make macro GT_ITM to point to the right path and correct Stanford Graphics Base library name installed in your system(e.g libgd.a, libgb4.a or libgb5.a etc). The library also comes as a part of gt-itm distribution. Under any circumstance it should reside under gt-itm/lib.

sgb2ns converts the sgb output to tcl output.
Usage : sgb2ns ts200-0.gb ts200.tcl

A modification to sgb2ns contributed by Yunxi Shi separates transit nodes from stub nodes when using transit-stub networks. The file (ts2ns.c) is included in sgb2ns distribution.

* Conversion of GT-ITM output to ns-2 hierarchical format
Download Padma Haldar's hierarchical converter package; it's included the sgb2ns distribution above. The package consists of sgb2hierns.c (the converter file) and example files t1000-0.gb (sgb file for 1000 nodes transit-stub) and hts1000.tcl (hierarchical topology converted from t1000-0.gb).
sgb2hierns converts the sgb output to a hierarchical topology in a tcl format suitable for ns-2.
Usage : sgb2hierns ts1000-0.gb hts1000.tcl
In order to use the scenario generator you would need the revised sgb2comns, which is also included in the sgb2ns distribution.

Tags :

May 7, 2006

Before you begin your journey into simulation, consider the followings.

To follow up on this:

Make a simulation plan first. What do I mean by that? I mean that, before you implement anything, think about WHAT you want to test and how you could show that. I am currently attending a lecture on simulation and our professor really stressed that most people doing computer simulations focus too much on the implementation and forget about the planning. He also said that planning should be 30-40% of the total work...

If you are into wireless routing protocol simulation, these are the things you should consider :

- ask myself what are the strengths/weaknesses of these protocols. For this you'll have to read the theorethical papers describing them and to understand how they are optimizing the network. Basically, routing is an optimization problem but it is not defined what to optimize for. eg.

  • quick set-up of routes?
  • guaranteeing route correctness?
  • little signalling overhead?
  • quality of routes once they are set up? etc.

    - now compare the theorethical goals of these protocols with each other.
    How could they be compared in a live setting? eg. is one of them tuned to a specific situation and the other one more to another scenario? Can they be compared at all or would you be comparing apples with oranges?

    How can you set up "obstacles" or bottlenecks for the protocols to see if they deal effectively with these difficulties?

    - definitely check the papers "MANET simulations - "the incredibles" by Kurkowski, Camp, and Colagrosso as well as "The mistaken axioms of wireless-network research" by Kotz, Newport, and Elliot.

    Think very hard about the PHY layer model you are going to use and whether/how this PHY model will influence your results.

    If you check the mailing list, you will find that some newer implementations have been announced - maybe you'll need to check them out.

    - to make your own life more simple: how can you seperate concerns so you really can test for cause and effect. I made this mistake in my own simulations; I tried to set up a "typical" scenario which got very, very complicated and I couldn't show anything anymore because the effects I saw were caused by multiple causes which all interacted/interfered with each other.

    I have now gone one step back and try to work out simple scenarios which test for only one effect first. When I have a better
    understanding (after doing several simple tests) I will try the complex scenario again. With the insight gained through the simple settings I might even be able to interpret what is happening there then :-)

    - only AFTER you have thought theoretically about all that and planned your simulation, sit down and actually start coding.


    Tags :


  • Problem in Installing NS 2.29.2-allinone

    If you find this error in your installation of the new version ns-allinone 2.29 2 :

    "checking system version (for dynamic loading)... ./configure: line
    7624: syntax error near unexpected token ')'
    ./configure: line 7624: ' OSF*)'
    tcl8.3.2 configuration failed! Exiting ...
    Tcl is not part of the ns project. Please see www.Scriptics.com to see
    if they have a fix for your problem."


    the problem is due to these files :

  • tcl: file tcl8.x.x/unix/tcl.m4.

  • tk: file tk8.x.x/unix/tcl.m4.

  • otcl: file otcl-1.x/configure.in.


  • According to Gauraz,

    The line generating the problem was :

    system=MP-RAS-`awk ' { print $3 } '/etc/.relid'`

    The problem lies in how bash 3.1.x and 4.x.x parse the configure file. This will simply pass through bash 3.0.x and lower versions. So in order to make things work I changed the above line to:

    system=MP-RAS-`awk ' { print $3 } '/etc/.relid`

    You will have to take following steps in order to bring the changes into effect:
    Remove the second last character ( ' ) from the line and do this for all the three files above. Now after changing the configuration files you will have to delete older configure file and any cache if it exists in the respective folders. After that do not forget to run autoconf from command line in the respective folders to generate a fresh configure file.

    And finally re-install it by the following command :

    ./install


    UPDATE :

    For Fedora core 5 or Debian users, you may find the following errors :

    some modifications should be done for ns2 source files, including:
    tcl_install_path/unix/configure
    tcl_install_path/unix/tcl.m4
    tk_install_path/unix/configure
    tk_install_path/unix/tcl.m4
    otcl_install_path/unix/configure

    The modification is:
    searching .relid'` in above files
    and replacing them with .relid`

    If you don't do above changes,
    then when you install, an error will occur:
    " checking system version (for dynamic loading)... syntax error near... "

    and there is a patch for that here :

    http://www.ececs.uc.edu/~cdmc/ucbt/src/ns2292-gcc410.patch

    sha1sum
    dc355ec01ca7ceae7f4a237fdf997ca31efd432f ns2292-gcc410.patch

    Tags :

    Mar 29, 2006

    How to get the number of nodes in the network in C++ code

    Here's the code on how to get the number of nodes in the network based on C++ code for Ns2


    For more info, click here

    Tags :

    Printing routing table in AODV

    Here's an example for printing routing table in AODV


    For more click here

    Tags :

    Mar 3, 2006

    How do add a new module in NS-2

    Got this translated from a chinese website (link).

    ** Based on cygwin and Ns-2 2.27

    To add a module in Ns-2 is not a simple task especially for beginner. Therefore it's the author's wish to assist beginner by writing this article. However, the author would like to remind that there are plenty of modules that already existing in Ns-2. By merely editing the exiting module and adding extra functions, it's sufficient to be the first step to add a new module in Ns=2.

    Step 1

    Open cygwin command window, and change directory to the following path
    cd ns-allinone-2.27/ns-2.27/queue

    Step 2

    Change the name of drop-tail.[cc, h] to myfifo.[cc, h]
    cp drop-tail.cc myfifo.cc
    cp drop-tail.h myfifo.h

    Step 3

    By using editor, edit myfifo.h and myfifo.c (if you are in windows environment, you may use software like Ultra-edit to edit)

    a. Firstly, edit myfifo.h by changing everything from Droptail to myfifo and drop_tail to myfifo

    #ifndef ns_myfifo_h
    #define ns_myfifo_h

    #include
    #include "queue.h"
    #include "config.h"

    /*
    * A bounded, drop-tail queue
    */

    class myfifo : public Queue {
    public:
    myfifo() {
    q_ = new PacketQueue;
    pq_ = q_;
    bind_bool("drop_front_", &drop_front_);
    bind_bool("summarystats_", &summarystats);
    bind_bool("queue_in_bytes_", &qib_); // boolean: q in bytes?
    bind("mean_pktsize_", &mean_pktsize_);
    // _RENAMED("drop-front_", "drop_front_");
    }
    ~myfifo() {
    delete q_;
    }
    protected:
    void reset();
    int command(int argc, const char*const* argv);
    void enque(Packet*);
    Packet* deque();
    void shrink_queue(); // To shrink queue and drop excessive packets.
    PacketQueue *q_; /* underlying FIFO queue */
    int drop_front_; /* drop-from-front (rather than from tail) */
    int summarystats;
    void print_summarystats();
    int qib_; /* bool: queue measured in bytes? */
    int mean_pktsize_; /* configured mean packet size in bytes */
    };

    #endif

    b. next is to edit myfifo.cc, change everything from DropTail to myfifo and everything from drop_tail to myfifo and drop-tail to myfifo

    #include "myfifo.h"

    static class myfifoClass : public TclClass {
    public:
    myfifoClass() : TclClass("Queue/myfifo") {}
    TclObject* create(int, const char*const*) {
    return (new myfifo);
    }
    } class_myfifo;

    void myfifo::reset()
    {
    Queue::reset();
    }
    int myfifo::command(int argc, const char*const* argv) {
    if (argc==2) {
    if (strcmp(argv[1], "printstats") == 0) {
    print_summarystats();
    return (TCL_OK);
    }
    if (strcmp(argv[1], "shrink-queue") == 0) {
    shrink_queue();
    return (TCL_OK);
    }
    }

    if (argc == 3) {
    if (!strcmp(argv[1], "packetqueue-attach")) {
    delete q_;
    if (!(q_ = (PacketQueue*) TclObject::lookup(argv[2])))
    return (TCL_ERROR);
    else {
    pq_ = q_;
    return (TCL_OK);
    }
    }
    }
    return Queue::command(argc, argv);
    }

    /*
    * drop-tail
    */

    void myfifo::enque(Packet* p)
    {
    if (summarystats) {
    Queue::updateStats(qib_?q_->byteLength():q_->length());
    }
    int qlimBytes = qlim_ * mean_pktsize_;
    if ((!qib_ && (q_->length() + 1) >= qlim_) ||
    (qib_ && (q_->byteLength() + hdr_cmn::access(p)->size()) >= qlimBytes)){
    // if the queue would overflow if we added this packet...
    if (drop_front_) { /* remove from head of queue */
    q_->enque(p);
    Packet *pp = q_->deque();
    drop(pp);
    } else {
    drop(p);
    }

    } else {
    q_->enque(p);
    }
    }

    //AG if queue size changes, we drop excessive packets...
    void myfifo::shrink_queue()
    {
    int qlimBytes = qlim_ * mean_pktsize_;
    if (debug_)
    printf("shrink-queue: time %5.2f qlen %d, qlim %d\n",
    Scheduler::instance().clock(),
    q_->length(), qlim_);
    while ((!qib_ && q_->length() > qlim_) ||
    (qib_ && q_->byteLength() > qlimBytes)) {
    if (drop_front_) { /* remove from head of queue */
    Packet *pp = q_->deque();
    drop(pp);
    } else {
    Packet *pp = q_->tail();
    q_->remove(pp);
    drop(pp);
    }
    }
    }


    Packet* myfifo::deque()
    {
    if (summarystats && &Scheduler::instance() != NULL) {
    Queue::updateStats(qib_?q_->byteLength():q_->length());
    }
    return q_->deque();
    }

    void myfifo::print_summarystats()
    {
    //double now = Scheduler::instance().clock();
    printf("True average queue: %5.3f", true_ave_);
    if (qib_)
    printf(" (in bytes)");
    printf(" time: %5.3f\n", total_time_);
    }

    Step 4

    Next is to edit ns-default.tcl by performing the followings

    a. cd ns-allinone-2.27/ns-2.27/tcl/lib/
    b. open ns-default.tcl by editor software
    c. look for Queue/DropTail
    d. change Queue/DropTail to Queue/myfifo

    Queue/DropTail set drop_front_ false
    Queue/DropTail set summarystats_ false
    Queue/DropTail set queue_in_bytes_ false
    Queue/DropTail set mean_pktsize_ 500

    Queue/myfifo set drop_front_ false
    Queue/myfifo set summarystats_ false
    Queue/myfifo set queue_in_bytes_ false
    Queue/myfifo set mean_pktsize_ 500

    Step 5

    Edit makefile by adding myfifo.cc into OBJ_CC and re-make Ns-2

    a. use editor software to open makefile in ns-allinone-2.27/ns-2.27
    b. look for drop-tail.o
    c. at the end of line for droptail.o add queue/myfifo

    ---------------------------------------------

    tools/flowmon.o tools/loss-monitor.o queue/queue.o queue/drop-tail.o queue/myfifo.o adc/simple-intserv-sched.o queue/red.o
    ---------------------------------------------

    d. re-make ns-2 by make command

    If there is no errors shown, then the module is successfully added.


    Step 6

    You may test the new module by using myfifo command instead of DropTail and verify the result of the simulation as the same as DropTail.

    Here's the summary of how to add a new module in NS-2

    1. Prepare the suitable module files (eg. a.cc and a.h)
    2. if necessary, make changes to ns-default.tcl
    3. edit makefile by adding the necessary module into OBJ_CC eg a.o into OBJ_CC
    4. re-make NS-2
    5. test the new module

    The author would like advise that users should look for the most similiar module to begin with instead of writing everything from scratch.


    Feb 15, 2006

    The next big step...adding a new protocol

    Well, you can't really do much with NS-2 if you would just like to play around with existing protocol. I guess the next big step is to test your very own protocol and see it runs in Ns-2.

    To start with adding new protocol, there is an online tutorial available (here).

    To begin adding new protocol, it's advised that we are familiar with Ns-2 and some C++ knowledge. (If any problem arises, refer back to "ns Notes and Documentation" (now renamed ns Manual).

    I will follow the example given on the site :

    Tips from the forum :

    1. Make sure your protocol agent same as the ping example given in the ns tutorials. Or you can follow one more easy way i.e. look at the codings for dsdv protocol and copy the important functionality of the coding. (You will need to define command and recv functions at least).

    2. Make your own directory (say myproto) in the same directory where the directory named dsdv is residing. Put your coding (say myproto.cc and myproto.h) in the directory 'myproto'.

    3. Now edit Makefile and put the things in the same way as for dsdv in there.

    4. Edit file ~ns/tcl/lib/ns-lib.tcl. In this file search DSDV with the first occurrence of dsdv you will see code like source mobility/dsdv.tcl. At this moment you
    don't need to write separate tcl file for your protocol therefore ignore it and go the second occurrence of dsdv in the file ~ns/tcl/lib/ns-lib.tcl and you will see a code section having switch-case control. Here just copy one more body like DSDV. There is only one line of code in the body of DSDV case. Copy the same and modify it for your protocol.

    For your protocol it will look like this :
    DSDV {
    //coding for dsdv (calling a function like dsdv-create-node)
    }
    MyProto {
    //coding for your protocol (calling your function)
    }
    DSR {
    //
    }

    remember to put space between 'MyProto' and '{' otherwise it won't work. Now go to the third occurrence of DSDV and you will see the coding which is called from the body in switch case. Here is the definition of the func.

    Define your function in the same way as for dsdv is there and comment the line containing call for dsdv-start-up because at this moment your protocol is not having any such functionality.

    If you will omit 4th step you will get error message like "Wrong node routing Protocol".

    5. run make in ~ns directory.

    6. Make a tcl script for testing your protocol and you are done.
    (extracted from here)

    Feb 4, 2006

    Monitor_queue Trace

    To monitor a queue between two nodes, command monitor-queue can be used.

    $ns monitor-queue
    This sets up a monitor that keeps track of average queue length of the queue on the link between nodes and . The default value of sampleinterval is 0.1.

    Eg.

    set monitor [$ns monitor-queue $S $D [open qm.out w] 0.1]

    Trace format :

    0.69999999999999996 0 1 0.0 0.0 12 12 0 5178 5178 0
    Time, From, To, qsizeB, qsizeP, arrivedP, departedP, droppedP, arrivedB, departedB, droppedB

    where *B is number in Bytes, and *P is numbers in Packets.

    Jan 26, 2006

    Exercise 3: Analyze Bandwidth Share of TCP and UDP Traffic

    It is equivalently important to understand the ns-2 output trace format and have some knowledge on how to extract relevant information. This exercise is dedicated to familiarize you with ns-2's output format, in particular by trace-all, and techniques to do trace post-processing.

    Topology: Use the simple.tcl example discussed in class, but first swap the source/destination of udp1 i.e. make its source be n1 and destination n3.

    As a result of running ns on the modified simple.tcl, we obtain an output file "simple.tr". It contains information of all packets enqueued (+), dequeued (-), received (r) and dropped (d).

    a. Modify the simple.tcl (name this, say, simple1.tcl) so that

  • there is only one UDP/CBR flow (i.e. do not start the second UDP/CBR flow)
  • start the two flows (1 TCP and 1 UDP) at the same time 0.1 s
  • run the script for 6s.


  • Extract information from the "simple.tr" file and compute the total bytes of TCP (tcp) and UDP (cbr) traffic over link 2-3 for the duration of the simulation. Then, compute total TCP and UDP/CBR traffic in bytes and ratios of TCP and UDP/CBR to the total. Finally, comment on the bandwidth share of TCP vs. UDP/CBR.

    b. Modify the simple1.tcl file (name this simple2.tcl) so that

  • there are two UDP/CBR flows
  • start the TCP and the 2 UDP flows at the same time 0.1 s
  • run the script for 6s.


  • Extract the information from the new simple.tr file and recompute the parameters above. What do you notice?

    Note: Fill in the blanks according to your understanding of trace format in the following awk command for computing the total bytes of TCP or UDP traffic

    awk '$1=="r" &&amp; ??==2 && ??==3 && $5=="??" {a += ??} END {print a}' simple1.tr

    simple.tcl script

    #create scheduler
    set ns [new Simulator]

    #choose colors
    $ns color 0 blue
    $ns color 1 red
    $ns color 2 green

    #turn tracing on
    set f [open simple.tr w]
    $ns trace-all $f
    set nf [open simple.nam w]
    $ns namtrace-all $nf

    #create topology
    set n0 [$ns node]
    set n1 [$ns node]
    set n2 [$ns node]
    set n3 [$ns node]

    $ns duplex-link $n0 $n2 5Mb 2ms DropTail
    $ns duplex-link $n1 $n2 5Mb 2ms DropTail
    $ns duplex-link $n2 $n3 1.5Mb 10ms DropTail
    #limit queue size (otherwise unlimited)
    #$ns queue-limit $n2 $n3 5

    #adjust nam orientation
    $ns duplex-link-op $n0 $n2 orient right-up
    $ns duplex-link-op $n1 $n2 orient right-down
    $ns duplex-link-op $n2 $n3 orient right

    #turn nam visualization for n2-n3 queue
    $ns duplex-link-op $n2 $n3 queuePos 0.5

    #create udp agent
    set udp0 [new Agent/UDP]
    #attach agent to node
    $ns attach-agent $n0 $udp0
    #select packet color for nam
    $udp0 set class_ 0
    #create a cbr application
    set cbr0 [new Application/Traffic/CBR]
    #attach application to agent
    $cbr0 attach-agent $udp0

    #create another udp/cbr agent/application
    set udp1 [new Agent/UDP]
    $ns attach-agent $n3 $udp1
    $udp1 set class_ 1
    set cbr1 [new Application/Traffic/CBR]
    $cbr1 attach-agent $udp1

    #create and attach null agents
    set null0 [new Agent/Null]
    $ns attach-agent $n3 $null0

    set null1 [new Agent/Null]
    $ns attach-agent $n1 $null1

    $ns connect $udp0 $null0
    $ns connect $udp1 $null1

    #schedule the start of cbr traffic
    $ns at 1.0 "$cbr0 start"
    $ns at 1.1 "$cbr1 start"

    #create and attach a TCP agent source/sink
    set tcp [new Agent/TCP]
    $tcp set class_ 2
    set sink [new Agent/TCPSink]
    $ns attach-agent $n0 $tcp
    $ns attach-agent $n3 $sink
    $ns connect $tcp $sink

    #attach an ftp application to the TCP agent
    set ftp [new Application/FTP]
    $ftp attach-agent $tcp

    #schedule start of ftp application
    $ns at 1.2 "$ftp start"

    #schedule end of ftp application
    $ns at 5.0 "$ftp stop"

    #$ns at 5.0 "$ns detach-agent $n0 $tcp ; $ns detach-agent $n3 $sink"

    #print the (default) cbr values
    puts [$cbr0 set packetSize_]
    puts [$cbr0 set interval_]

    $ns at 6.0 "finish"

    proc finish {} {
    global ns f nf
    $ns flush-trace
    close $f
    close $nf

    #puts "running nam..."
    #exec nam simple.nam &
    exit 0
    }

    $ns run

    ** Refer to previous post on Network Simulator, Ns-2 Trace format

    Jan 25, 2006

    What the heck is classifier?

    A basic function of a node is to receive packets and examine the packet's field (header) by identifying its destination address and source address. This task is performed by classifier that sit in the node.

    There are several types of classifiers for different purposes. A classifier provides a way to match a packet against some logical criteria and retrieve reference to another simulation object based on match results. Each packet received will be matched with the slot numbers indexed in the classifier.

    The C++ classifier defined in ~ns/classifier.h

    class Classifier : public NsObject {
    public:
    ~Classifier();
    void recv(Packet*, Handler* h = 0);
    protected:
    Classifier();
    void install(int slot, NsObject*);
    void clear(int slot);
    virtual int command(int argc, const char*const* argv);
    virtual int classify (Packet *const) = 0;
    void alloc(int);
    NsObject** slot_; /* table that maps slot number to a NsObject */
    int nslot_;
    int maxslot_;
    };


    Therefore when a classifier received, recv() a packet, it will be handed to the classify() method. The classifier will make sure a slot is assigned to each packet.

    ** For unicast, address classifier is used. It applies a bitwise shift and mask operation to packet's destination address to produce a slot number.

    There is also a multicast classifier.. well that is a total different matter.. :-)